Build an affiliate opt-in email list while your program grows. Ultimate Affiliate Pro can send the email address of every new affiliate to Mailchimp or another email marketing service at registration, or keep the addresses in a built-in list on your site. You can also add a newsletter checkbox to the registration form, so only affiliates who agree are subscribed.
A list of your affiliates lets you send them product launches, promotion ideas and new creatives. The opt-in runs on top of the affiliate registration form, so set that up first in Set up the registration, login and password pages.
Before you start
- A working affiliate registration page with the
[uap-register]shortcode. - An account with your email marketing service and a list (in Mailchimp, an audience) that accepts new contacts with only an email address and a name. If the list asks for more required fields, add them as optional in your service.
- For Wysija or Mailster: the plugin installed and active on this site, with at least one list.
Turn on Opt-In Integrations #
Go to Ultimate Affiliate Pro›Modules and open the Opt-In Integrations card. The Opt-In Settings page opens.
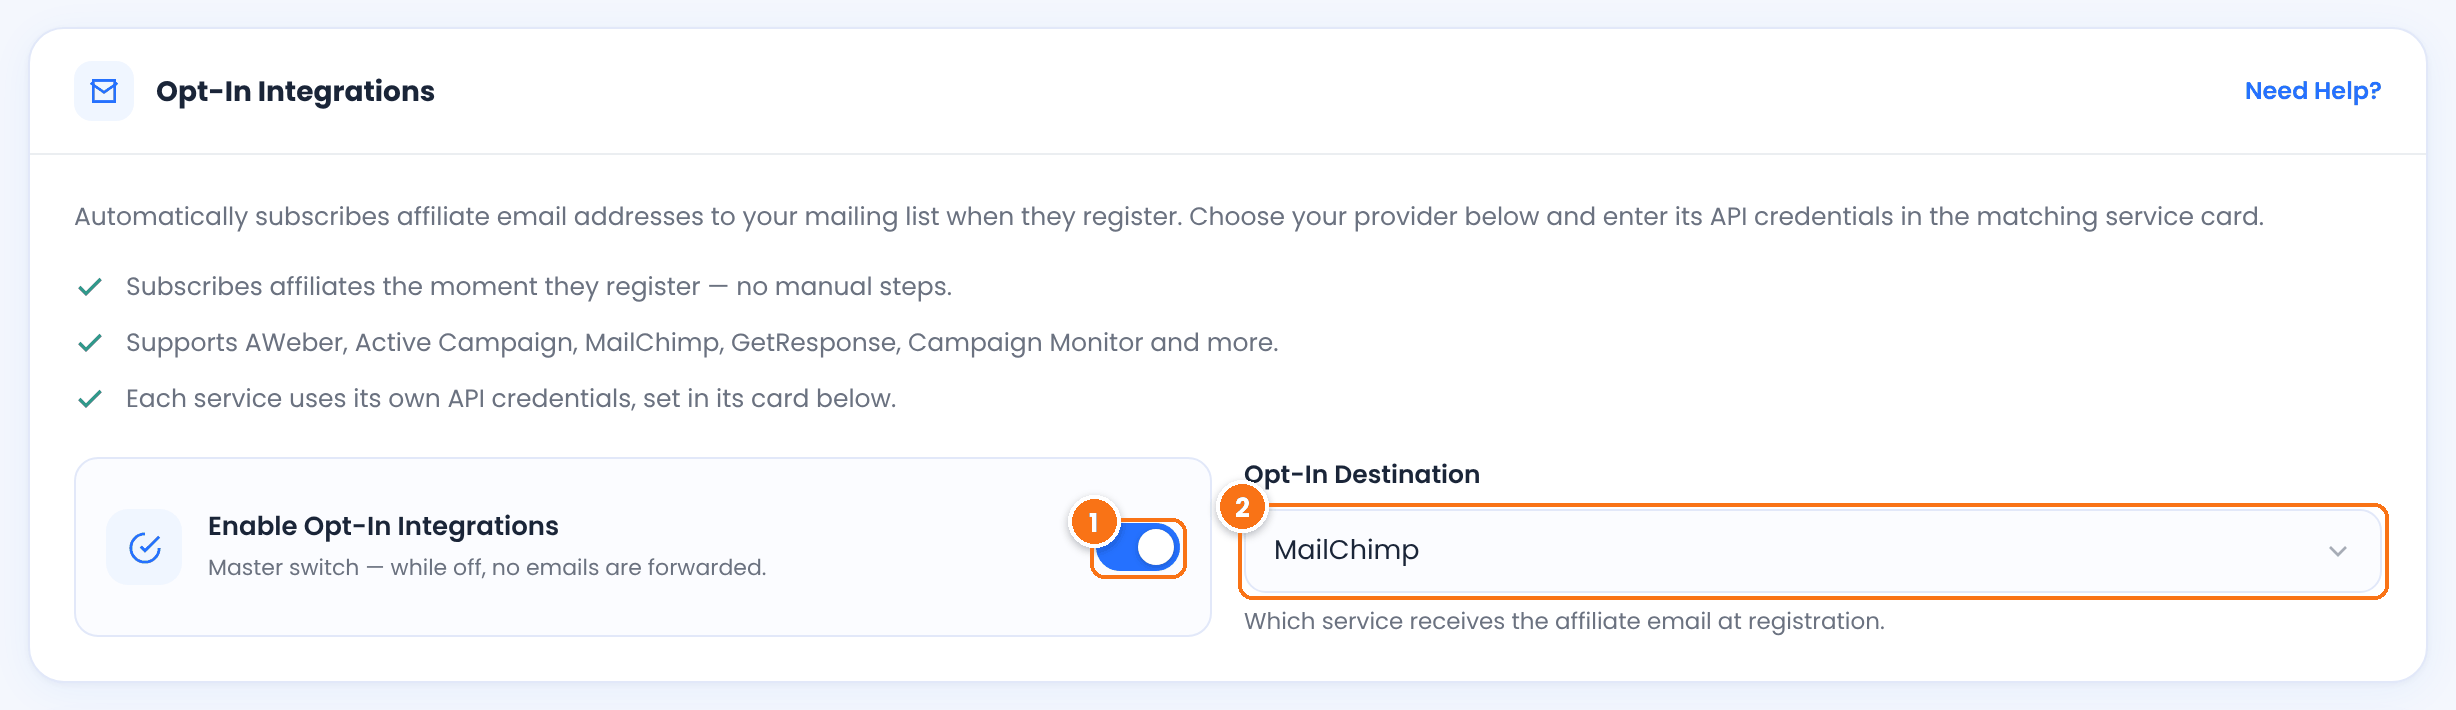
The master switch. While it is off, no email addresses are sent anywhere.
Default: Off
The service that receives the email of each new affiliate: AWeber, Active Campaign, CampaignMonitor, Constant Contact, E-mail List, GetResponse, IContact, Mad Mimi, MailChimp, Mailster (MyMail) or Wysija. Choose E-mail List to keep the addresses on your site.
Default: E-mail List
Below this card, each service has its own card with its credentials. The card of the selected service shows the Active destination label. Only the selected service receives new affiliates, so you can fill in one card and leave the others empty.
Connect Mailchimp #
Select MailChimp in Opt-In Destination and fill in the MailChimp card.
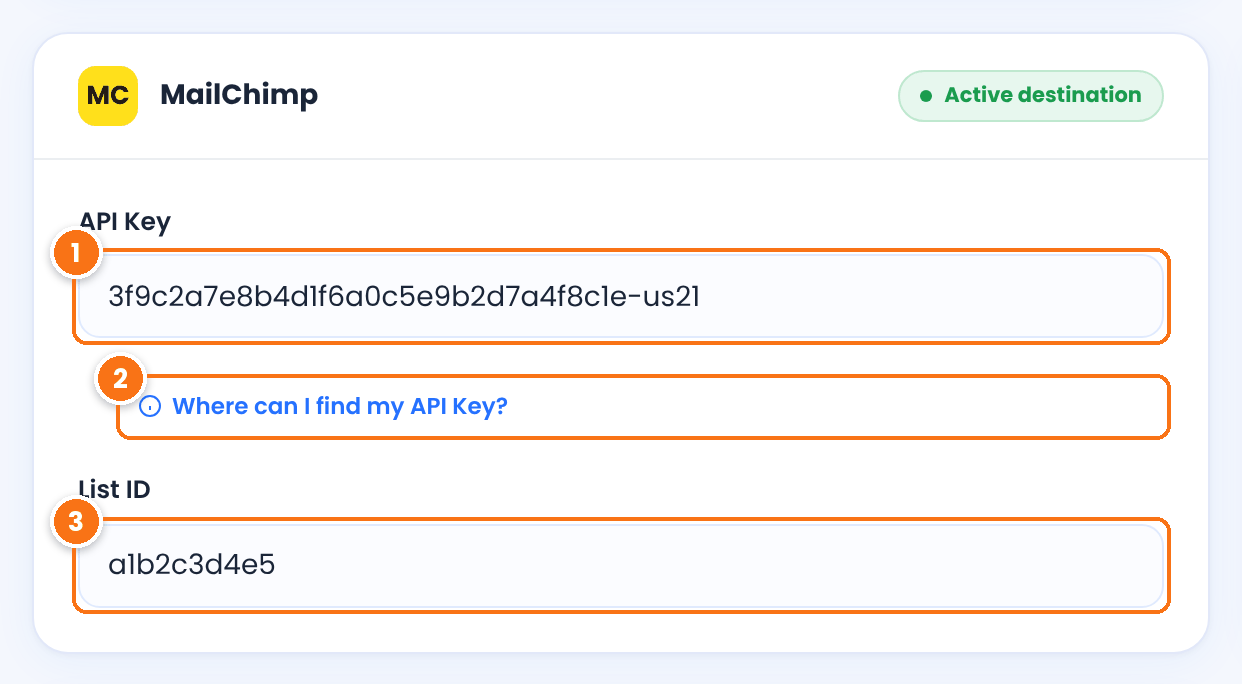
In Mailchimp, open your profile icon menu and choose Profile, then Extras › API keys. Under Your API Keys, click Create A Key, give it a name, such as Affiliate program, and click Generate Key. Click Copy Key to Clipboard and keep the key somewhere safe: you can’t view the full key again. Click Done. Paste the whole key here, including the ending with your data center, for example -us21. Keys created on or after June 22, 2026 expire after one year, so create a new key and paste it here when that happens.
Opens the Mailchimp help on API keys. See also About API keys in the Mailchimp documentation.
The ID of the Mailchimp audience that receives your affiliates. In Mailchimp, open the Audience menu. If you have more than one audience, choose it in the Audience drop-down. Open More options and choose Audience settings. In the Audience ID row, click the copy icon. The ID is a short code such as a1b2c3d4e5. See Find your audience ID.
Click Save Changes in the bar at the bottom of the page.
Each new affiliate is added to the audience as subscribed, with the first and last name from the registration form in the FNAME and LNAME fields. Mailchimp does not send its own confirmation or welcome email for these contacts. If an address is already in the audience, its details are updated.
Other opt-in services #
Every other service works the same way: select it in Opt-In Destination, fill in its card and click Save Changes. Most services also receive the first and last name of the affiliate.
| Service | Fields to fill in |
|---|---|
| AWeber | Click Get your Auth Code, log in to AWeber and allow access. Paste the code in Auth Code and click Connect. Then enter the Unique List ID of your AWeber list, for example awlist1234567. |
| Active Campaign | API URL and API Key, from Settings › Developer in ActiveCampaign, and the List ID. |
| GetResponse | GetResponse API Key and GetResponse List Token, the token (ID) of the list that receives the contacts. |
| Campaign Monitor | CampaignMonitor API Key and CampaignMonitor List ID. |
| iContact | iContact Username, iContact App ID, iContact App Password and iContact List ID. |
| Constant Contact | Constant Contact Username and Constant Contact Password. Click Get Lists, then choose the list in Constant Contact List. |
| Mad Mimi | Username or Email, API Key and List Name, exactly as the list is named in Mad Mimi. |
| Wysija (MailPoet) | Choose the List. Lists are pulled from the Wysija plugin installed on your site. Without it, the card shows No List available. |
| Mailster (MyMail) | Choose the List. Lists are fetched from the Mailster plugin installed on your site. |
Add the newsletter checkbox to the registration form #
By default, the email of every new affiliate is sent to your list. To let affiliates choose, show the newsletter checkbox on the form. Go to Ultimate Affiliate Pro›Showcases›Registration Form and open the Custom Fields tab. Type newsletter in the filter box to find the field.
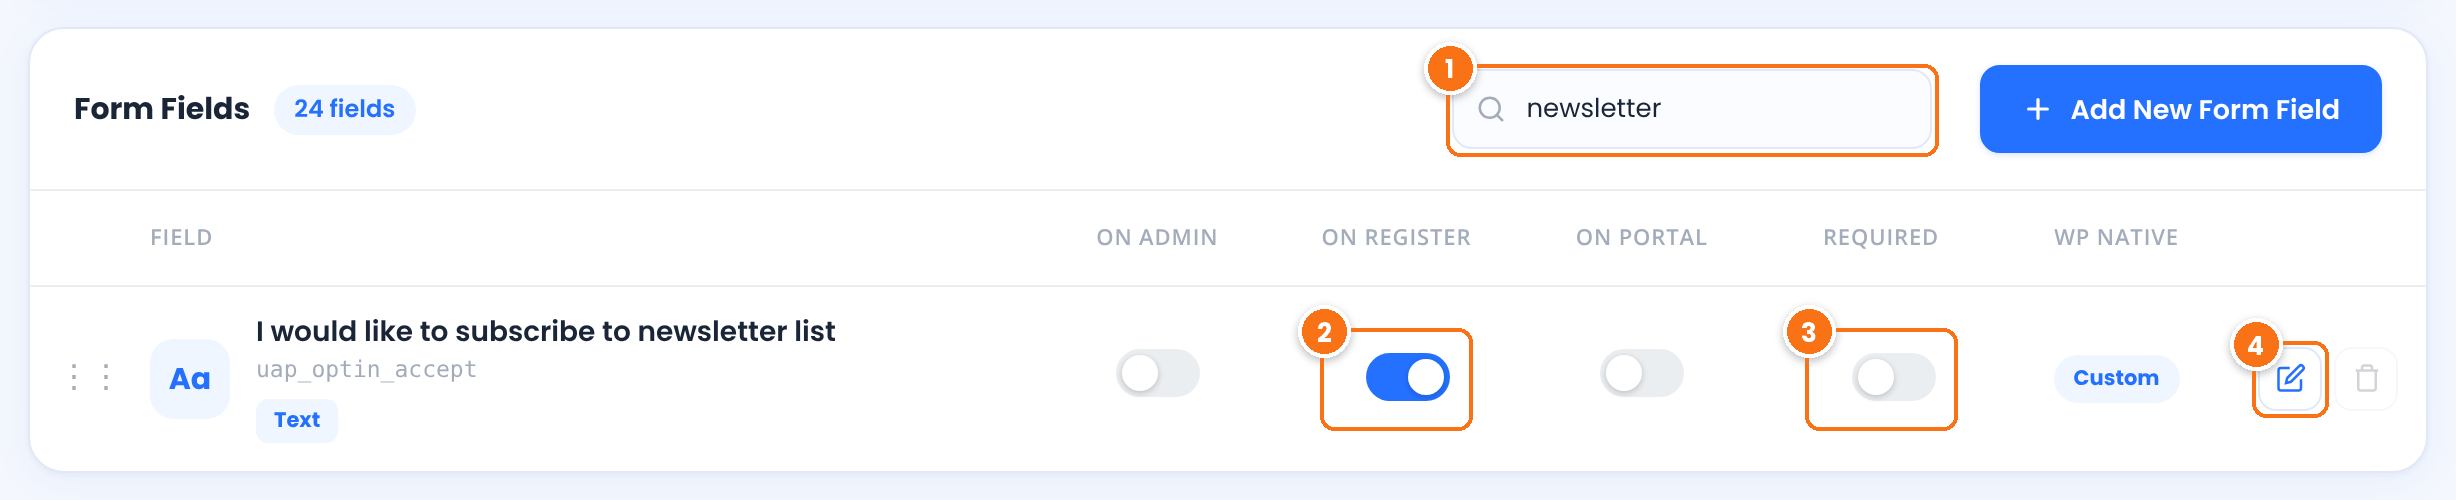
Finds the field I would like to subscribe to newsletter list (uap_optin_accept). It is a built-in field, so it cannot be deleted.
Shows the checkbox on the registration form. Once it is on, only affiliates who tick the box are subscribed.
Default: Off
Makes the checkbox mandatory. Keep it off so affiliates can join your program without subscribing.
Default: Off
Change the label, for example to Send me news and tips for affiliates, or fill in SubLabel, the text shown next to the checkbox.
Click Save Changes. For more on the form fields, see Customize the affiliate registration form.
This is how the checkbox looks on the registration page:
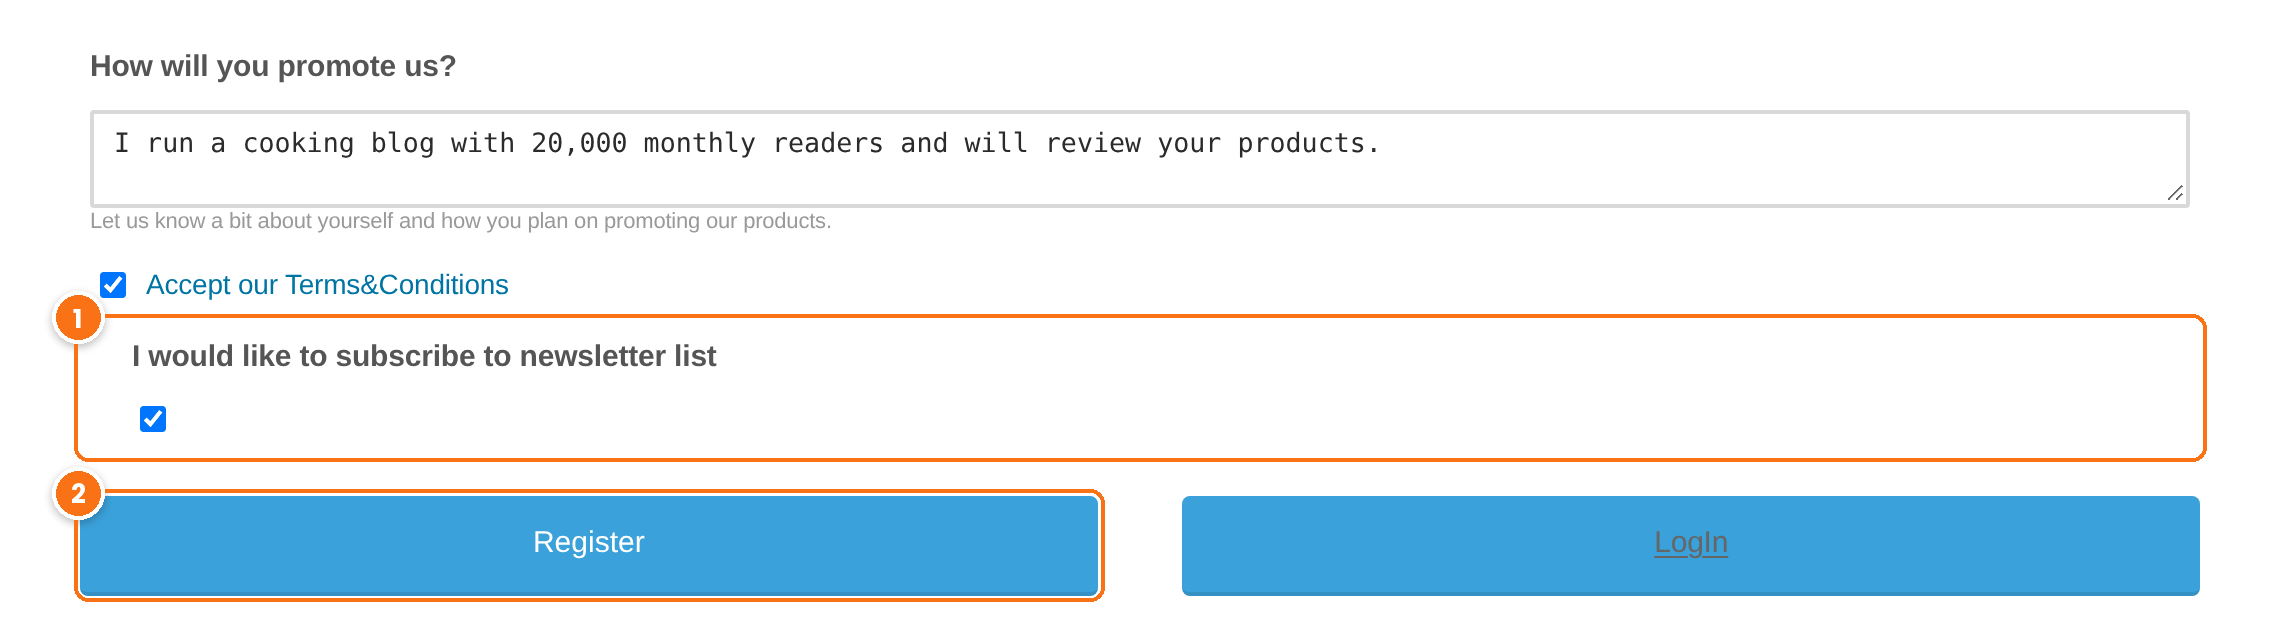
Unticked by default. The affiliate ticks it to subscribe.
Creates the affiliate account. If the box is ticked, the email is sent to your opt-in destination at the same moment.
Double opt-in with email verification #
To subscribe only confirmed addresses, turn on the Email Verification module. New affiliates then get an email with a verification link, and their address is sent to your list only after they click it. Affiliates who never verify are not subscribed. See Approve affiliates and verify their email.
Use the built-in E-mail List #
Choose E-mail List in Opt-In Destination to store the addresses on your site instead of sending them to a service. It is also a simple way to test the opt-in before you connect a service. The addresses appear at the bottom of the Opt-In Settings page.
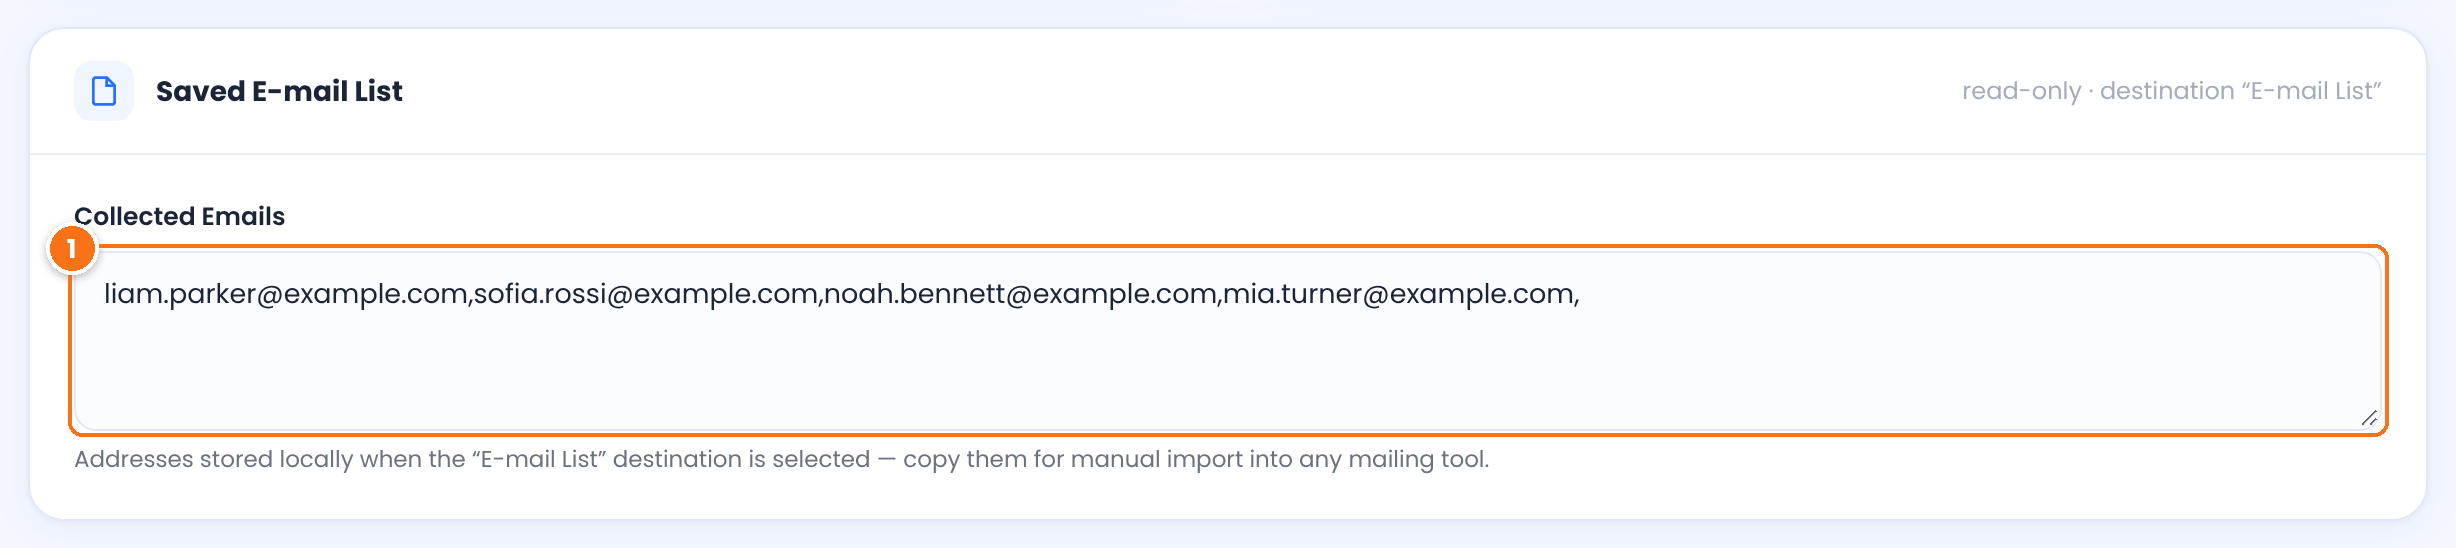
A read-only list of the collected addresses, separated by commas, newest last. Copy it and import it into any email marketing tool, or paste it into a spreadsheet.
Where your subscribers appear
- E-mail List: in Collected Emails, at the bottom of the Opt-In Settings page.
- Mailchimp and the other services: in the list or audience you entered, in your account with that service.
- Wysija or Mailster: in the selected list, in that plugin on your site.
Test it #
- In Ultimate Affiliate Pro›Modules›Opt-In Integrations, select E-mail List, or the service you connected, and click Save Changes.
- Open your registration page in a private browser window and register a test affiliate, for example
test.affiliate@example.com. Tick the newsletter checkbox if you added it. - If Email Verification is on, click the link in the verification email.
- Check Collected Emails, or the list in your email service. The test address should be there.
- Delete the test affiliate in Ultimate Affiliate Pro›Affiliates and remove the test contact from your list.
Frequently asked questions #
How do I build an affiliate opt-in email list?
Go to Ultimate Affiliate Pro, Modules, Opt-In Integrations. Turn on Enable Opt-In Integrations, choose your email service in Opt-In Destination, fill in its credentials and save. Every new affiliate is added to your list when they register.
Which email services can I connect?
AWeber, Active Campaign, Campaign Monitor, Constant Contact, GetResponse, iContact, Mad Mimi, Mailchimp, Mailster (MyMail) and Wysija. You can also keep the addresses on your site with the E-mail List destination.
Can affiliates choose whether to subscribe?
Yes. Turn on On Register for the I would like to subscribe to newsletter list field in the Custom Fields tab of the Registration Form. Only affiliates who tick it are subscribed.
Are existing affiliates added to the list?
No. Only affiliates who register after you turn the module on are sent. To add existing affiliates, export them to CSV in Ultimate Affiliate Pro, Export-Import, and import the file into your email service.
Can I send affiliates to more than one list?
The opt-in sends each new affiliate to one destination, the one selected in Opt-In Destination.
Does it support double opt-in?
Yes, through the Email Verification module. The address is sent to your list only after the affiliate clicks the verification link.


